Create an order flow
Create an order flow
In this tutorial, you will learn how to create an order flow with the manufacturing steps that you need to handle your order.
Step-by-step: How to create your own order flow
The steps below guide you through the process of creating an order flow that handles a product order.
Before getting started, make sure you understand the basic concepts of Twikit Live by reading the Tour of the UI.
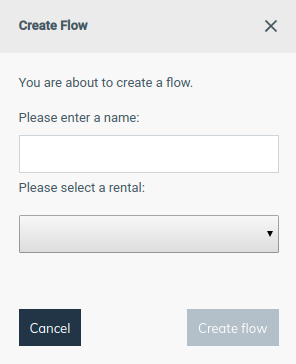
On the Twikit Order Service website, go to the order flows page and click the ‘plus’ button on the bottom right.
In the ‘Create Flow’ pop-up that appears, fill in a human readable name of at least five characters to identify your user flow. Then select a rental, which is the product space where your product is located. Finalize the flow creation by clicking the ‘Create flow’ button.
Upon successful creation of the flow, a JSON editor appears as in the picture below where you can define the required sequence of stages to fulfill your order flow. The required JSON schema to use is documented here: https://orders.twikit.com/api/docs/#/components/schemas/IFlowStage.

Example task definitions
In the sections below, you can find some example task definitions to use in your order flow stages. The task definitions describe how to use the built-in functionality for sending e-mails, getting a manual confirmation and triggering a Twikbot export.
Example 1: Send an e-mail
The task definition below sends an e-mail to a list of recipients. Notice the following items in the JSON definition below:
The handler key is set to “send-email”.
In the task definition payload, a list of recipients can be specified, as well as an e-mail subject and body with variable inputs.
The timeout duration is set to 1000 ms.
No next task definition is defined.
{
	"key": "task-key-1",
	"handlerKey": "send-email",
	"payload": {
		"recipient": [
			"test-order@twikit.com"
		],
		"subject": "My test e-mail subject",
		"body": "This is an e-mail to notify you someone ordered a product from your website.\
		         <br><br>Order url: {orderUrl} \
		         <br><br>Customer info: \
		                 <br>Name: {customerInfo.name}\
		                 <br>Email: {customerInfo.email}\
                         <br>Phone: {customerInfo.phone}\
                         <br>Message: {customerInfo.message}"
    },
	"timeoutDuration": 1000,
	"next": []
}Example 2: Send an e-mail with assets
The task definition below sends an e-mail with assets to a list of recipients. Notice the following items in the JSON definition below:
The handler key is set to “asset-email”.
The task definition payload contains the following items:,
filter: this filters asset names.
recipients: a list of recipients that will receive the e-mail once the task definition is triggered. A variable e-mail called ‘customerEmail’ can be used here.
subject: e-mail subject
body: e-mail body with variable inputs
needConfirmation: if set to true, a confirmation link will be added to the e-mail. If the link is clicked, the task definition is finished.
The timeout duration is set to 1000 ms.
The “next” field states that if this task definition finished successfully, then task definition with key “task-key-3” will be executed.
{
	"key": "task-key-2",
	"handlerKey": "asset-email",
	"payload": {
		"filter": "^\\s*(.*\\.[zZ][iI][pP])\\s*$",
		"recipients": [
			"{customerEmail}",
			test@twikit.com
		],
		"subject": "My test e-mail subject",
		"body": "Dear customer,\
		         <br><br>Please find an overview of your assets below:
		         <br><br>{assetOverview}\
                 <br><br>Best regards,
                 <br>The TWIKIT team.",
		"needConfirmation": false
    },
    "timeoutDuration": 1000,
	"next": [{
		"taskDefinitionKey": "task-key-3",
		"trigger": "success"
	}]
}Example 3: Export product with Twikbot
The task definition below calls a rest API uri that triggers an export with Twikbot.
A Twikbot export is a sequence of actions algorithms that runs on the Twikit server to calculate production files for digital manufacturing.
A typical scenario is a website with a 3D web configurator where a product is visualized in 3D in the browser in low resolution. This low resolution product is used by the end-customer for real-time visualization and setting product parameters. Upon ordering, the high-resolution models of the same product are used to, in combination with the user parameter settings, generate high quality manufacturing files. This way of working is one of the main USP’s of using Twikit. It guarantees a snappy user experience and saves an enormous amount of server costs.
Notice the following items in the JSON definition below:
The handler key is set to “consume-rest-api”.
The task definition payload contains the following items:,
uri: URI of the Twikbot export connector. It is the same for every product export.
sendsFeedback: If set to true, feedback will be sent to the
updateUrlas specified in the create order request.
The timeout duration is set to 1000 ms.
The “next” field states that if this task definition finished successfully, then task definition with key “task-key-3” will be executed.
{
	"key": "task-key-3",
	"handlerKey": "consume-rest-api",
	"payload": {
		"uri": "https://tbos-adapter.twikit.com/tbos/tb/export",
		"sendsFeedback": true
	},
	"timeoutDuration": 1000,
	"next": []
}Freely integrate with your own API’s
How to create a connector to integrate with your own third party service
For more advanced use cases, the set of order flow connectors that Twikit provides may be insufficient. Therefore, Twikit Order Service provides a way to extend the capabilities and create your own connectors. Learn more about this in the tutorial ‘Make your own Twikit Live Connector’.