Order Service (legacy manual)
What and why?
What is Twikit Order Service? Twikit Order Service is an order management software for digital manufacturing. It is a secure web platform that is accessible from anywhere through a web browser and allows to create, track and manage orders for digital manufacturing. Twikit Order Service has an open API and is extensible using plugins to integrate with your preferred digital manufacturing and ERP systems.
Why Twikit order service? Built to track unique products. Flexible system. Open API and easily extensible.
Feature overview
Access your orders anywhere with a secure web app
Provides secure web access on desktop and mobile with your Twikit credentials.Create, manage and track orders for digital manufacturing
The Twikit Order Service web module can be used to place, track and manage orders for digitally manufactured products.
Learn how to create your own orderCreate your own order flows
Order flows can be configured to fit your way of working. Built-in functionality includes scheduling timeouts, sending e-mails, managed user tasks, exporting production files for digital manufacturing, …
Learn how to create an order flowExplore existing integrations
Explore our existing integrations with slicing software, digital manufacturing networks, service providers, ERP systems and more.
Explore third-party integrationsFreely integrate with your own API’s
Learn how to create your own integrations.
Learn to create your own integrations
User documentation
Getting started with Twikit Order Service
For who?
New users and leads of Twikit Order Service.
Level
Basic
Quickstart
Go to https://orders.twikit.com/.
Intro
If you are a user who wants to get started with Twikit Order Service or are interested to learn more about its functionalities, this is the tutorial for you.
Before getting started, make sure you have your Twikit account credentials (e-mail and password) at hand. Contact us if you don’t have a personal Twikit account yet.
Pages overview
Log in
Twikit Order Service is accessible through the following URL: https://orders.twikit.com/.
The URL initially leads to a login screen. Here, you can use your Twikit account credentials to log in.

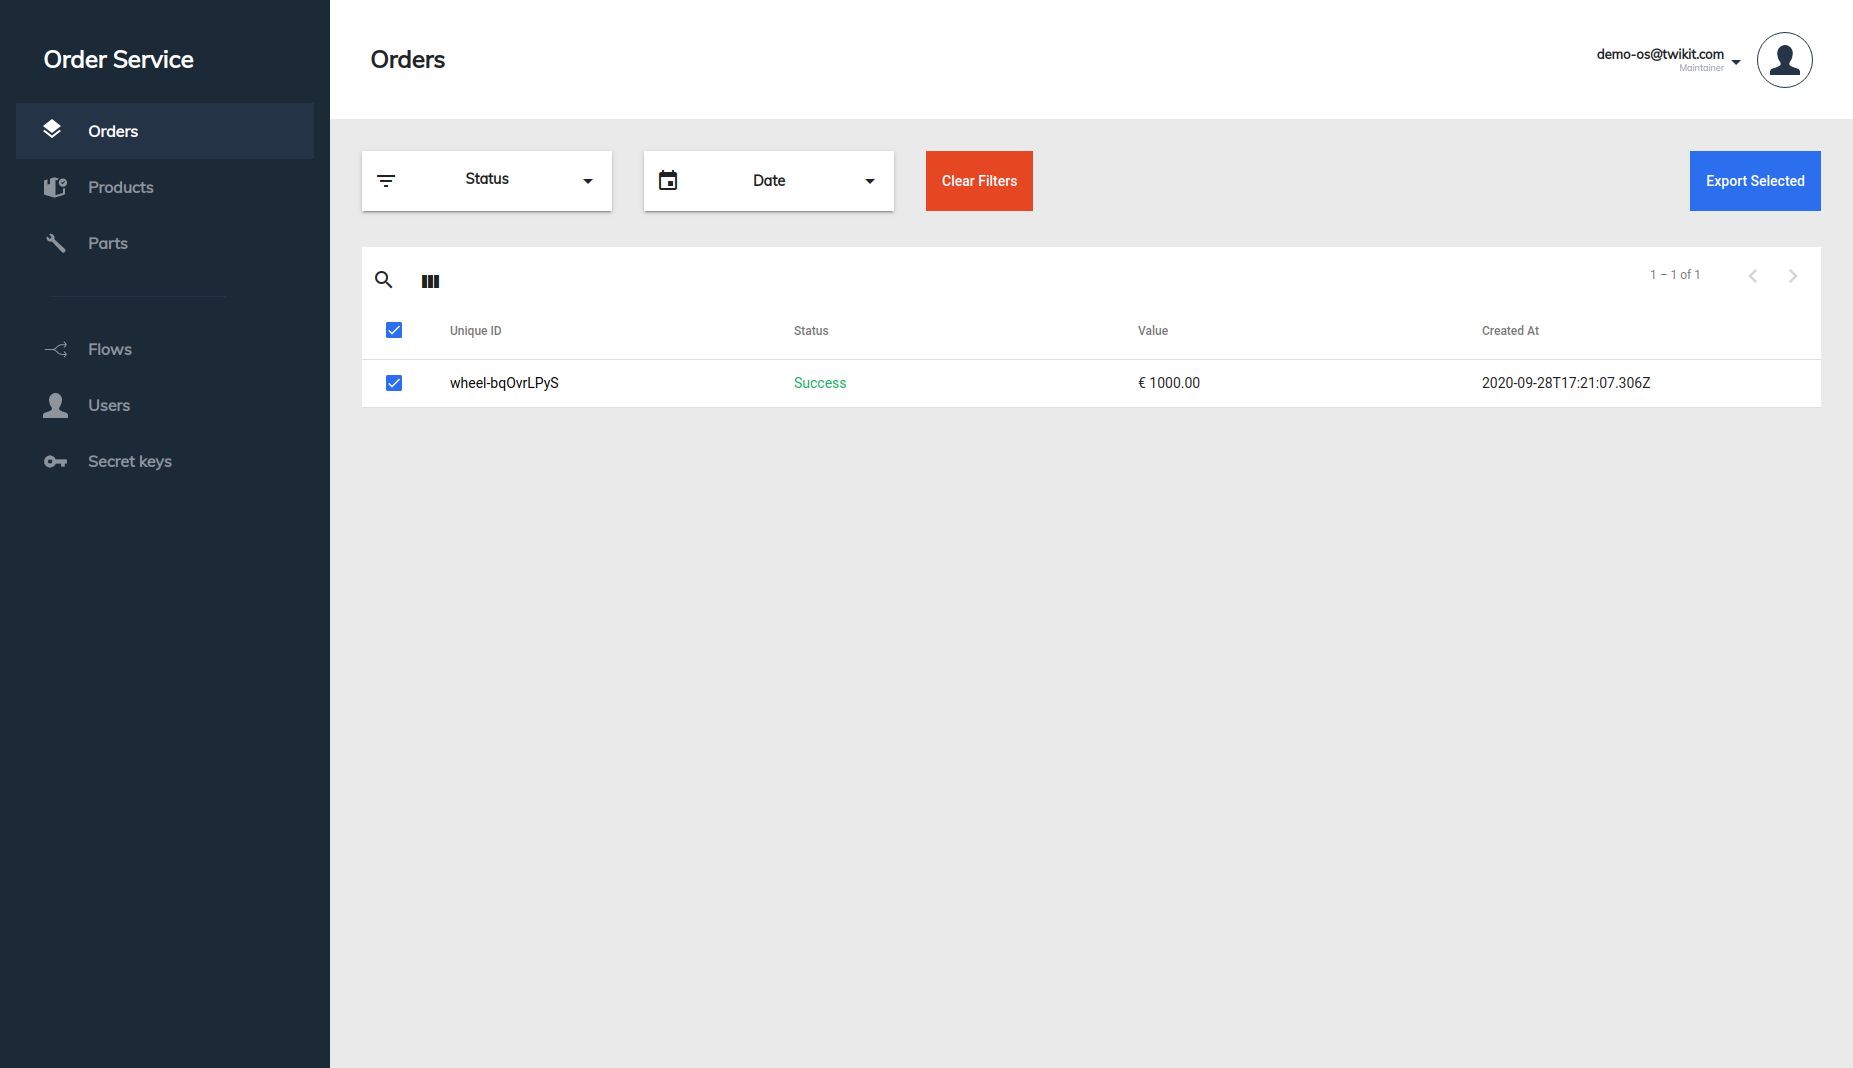
Orders page
Once logged in, you arrive at the home page, the Orders page. Using the navigation bar on the left, you can navigate to different pages.
On the Orders page, a table of all orders is shown.
An order is a request for something to be made, supplied or served. An order is typically created by a client in an e-commerce website and can be tracked in Twikit order service using the order service API. Orders can consist of multiple products and be linked to order flows. For more information, see the order details page.
The table of orders has the following columns:
Order: Name of the order, usually refers to a unique identifier for an order in your application. E.g. order number in a webshop or production ID.
Status: Status of the order, available order statuses are:
Created The order was created, but no order flow is triggered yet.
In progress The order flow is running.
Success The order flow finished successfully.
Unhealthy The order flow timed out.
Failure An error occurred while processing the order.
Value: The total value of your order in Euro (€).
Created at: Creation date of your order
Deadline: Due date of your order
Order ID (hidden): Auto-generated unique ID, internally used by Twikit.
Orders in the table can be filtered by status, date created, and/or text search. Columns can be shown and hidden by toggling the column visibility. Furthermore, it is also possible to sort the table by a column value by clicking the column title.
By selecting the checkbox before the row and pressing the export button, you can export the displayed information of up to 50 orders as a CSV file.
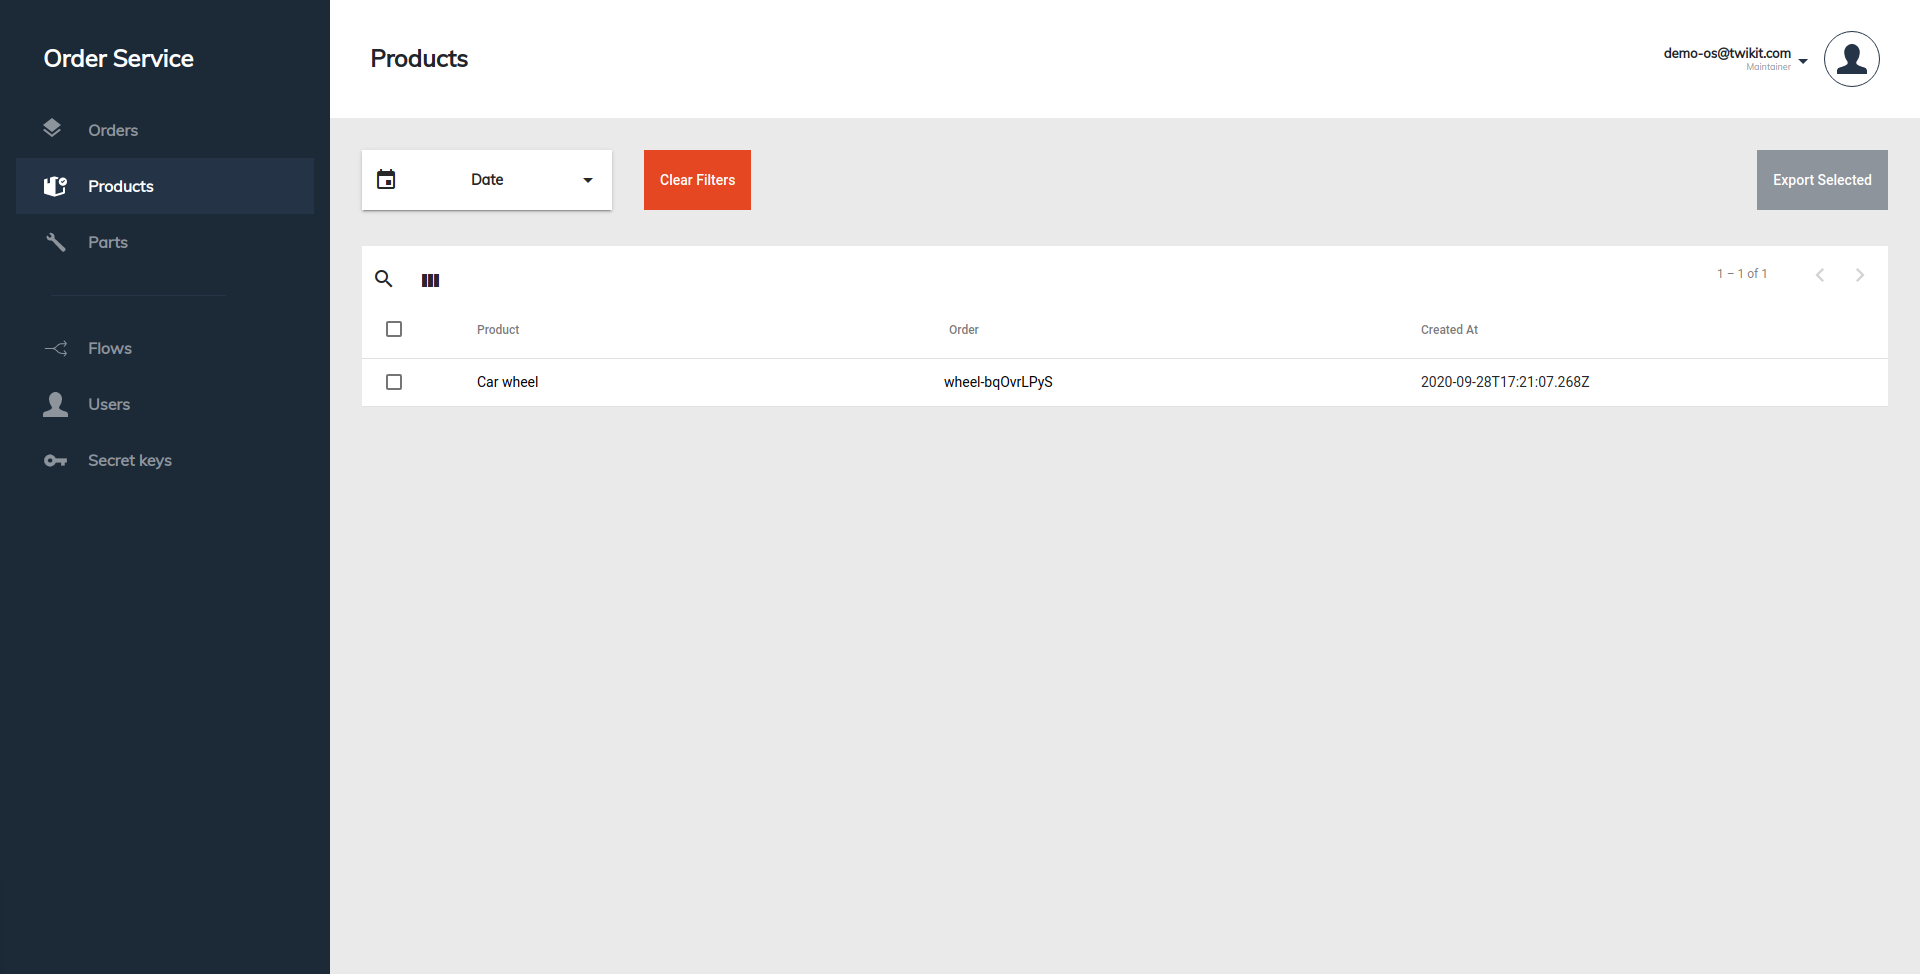
Products page
On the Products page, a table of all products is shown.
A product is a specific commodity to be made, supplied or served. A product is typically linked to a configuration. Products consist of individual parts, each part is something that is needed for the product to be complete.
The table of products has the following columns:
Product: Name of the product, usually refers to the product name or product configuration.
Order: Refers to the name of the order that contains this product.
Amount of units: Number of products that were ordered.
Value: The value of a single product unit in Euro (€).
Created at: Creation date of your order
Product ID (hidden): Auto-generated unique product ID, internally used by Twikit.
Order ID (hidden): Auto-generated unique order ID, internally used by Twikit.
Products in the table can be filtered by date created and/or text search. Columns can be shown and hidden by toggling the column visibility. Furthermore, it is also possible to sort the table by a column value by clicking the column title.
By selecting the checkbox before the row and pressing the export button, you can export the displayed information of up to 50 products as a CSV file. If you choose to export assets along with the products, you will download a zip folder containing the required files for each product.
Parts page
On the Parts page, a table of all parts is shown.
A part is a specific commodity of a product to be made, supplied or served. A part is typically linked to a producible or stock item part of a product (or the entire product). Parts can have data specific to the item or assets that are required for the fulfillment of the part.
The table of parts has the following columns:
Part: Name of the part, usually refers to the part name or part configuration.
Product: Refers to the name of the product that that contains this part.
Order: Refers to the name of the order in which the product with this specific part is stored.
Created at: Creation date of your order.
Part ID (hidden): Auto-generated unique part ID, internally used by Twikit.
Product ID (hidden): Auto-generated unique product ID, internally used by Twikit.
Order ID (hidden): Auto-generated unique order ID, internally used by Twikit.
Parts in the table can be filtered by date created and/or text search. Columns can be shown and hidden by toggling the column visibility. Furthermore, it is also possible to sort the table by a column value by clicking the column title.
By selecting the checkbox before the row and pressing the export button, you can export the displayed information of up to 50 parts as a CSV file. If you choose to export assets along with the part, you will download a zip folder containing the required files for each part.

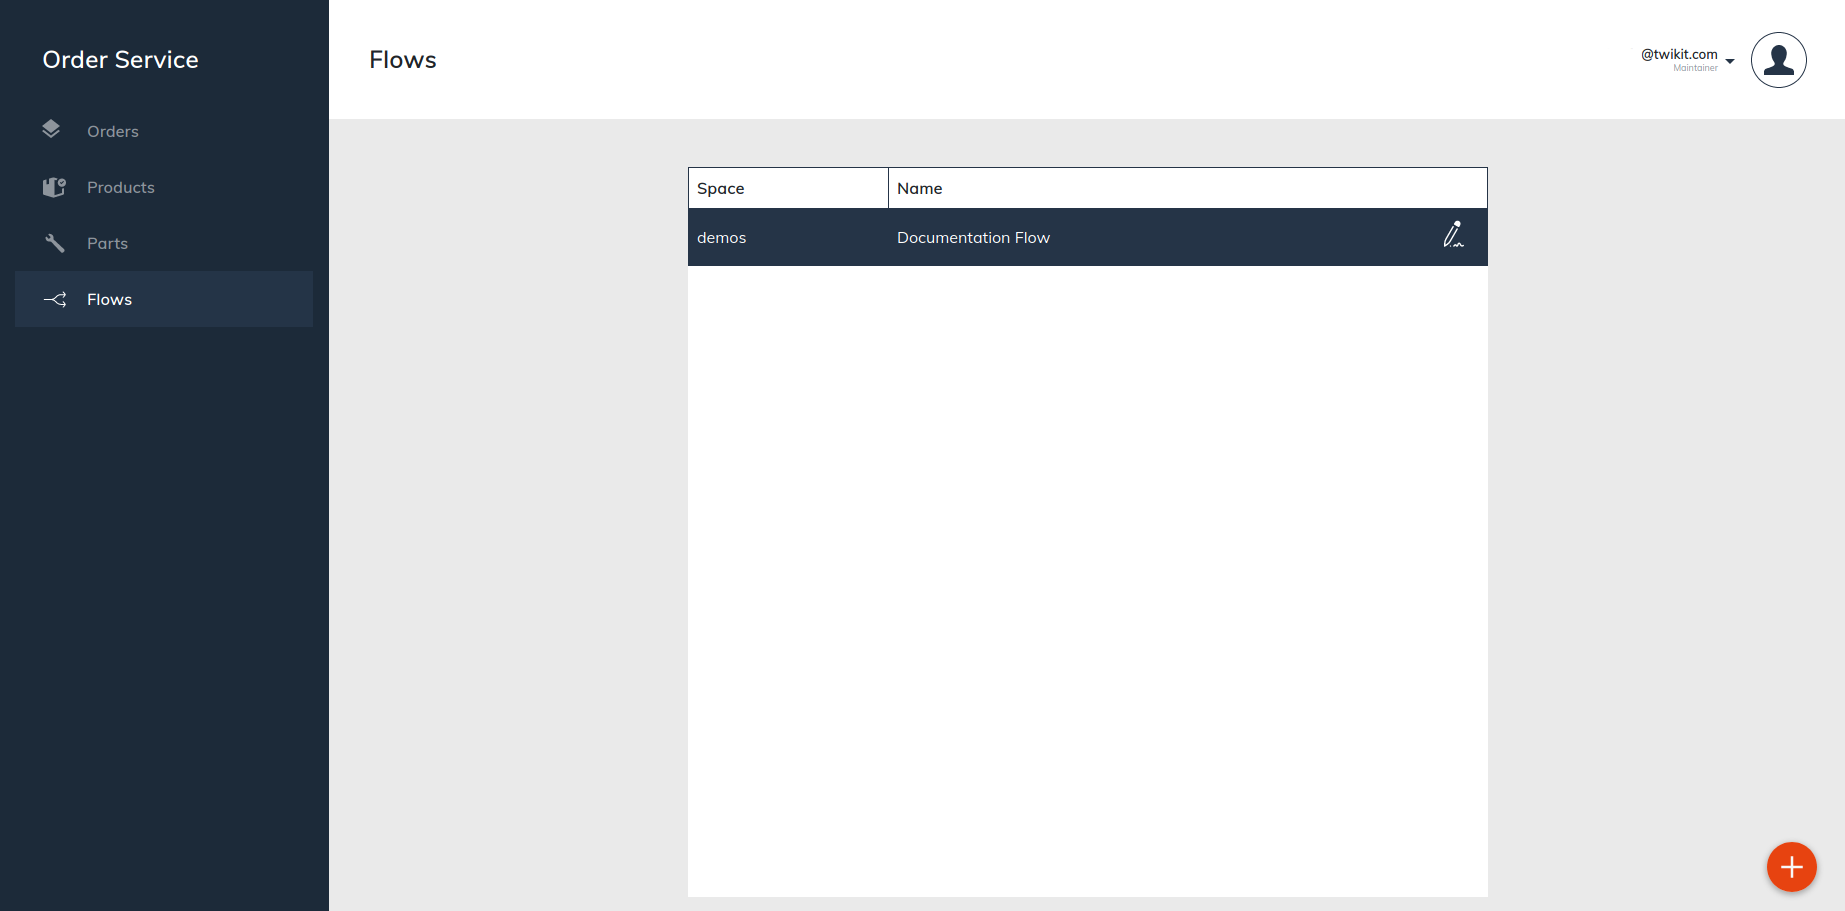
Order flows page
On the Order flows page, a table of all available order flows is shown.
An order flow defines how an order is handled. It consists of a number of logical steps that an order has to go through before it’s considered ‘Done’. For more information, see the order flow tutorial.
The “+” button on the bottom right adds a new order flow. In the table of order flows, each row is an order flow. It is uniquely defined by a product space and an order flow name. The pencil button next to each order flow allows to adapt the order flow.
A product space is the name of a product collection, also called a product rental in the remainder of the text.
It’s not possible to change the name and the space of an order flow after it was created. Order flows also cannot be deleted from the UI.
Users page (admin only)
The Users page lists all active users within your organization. A comma-separated list of tags can be added to each user. Tags are used to highlight relevant orders for certain users in the table of orders.
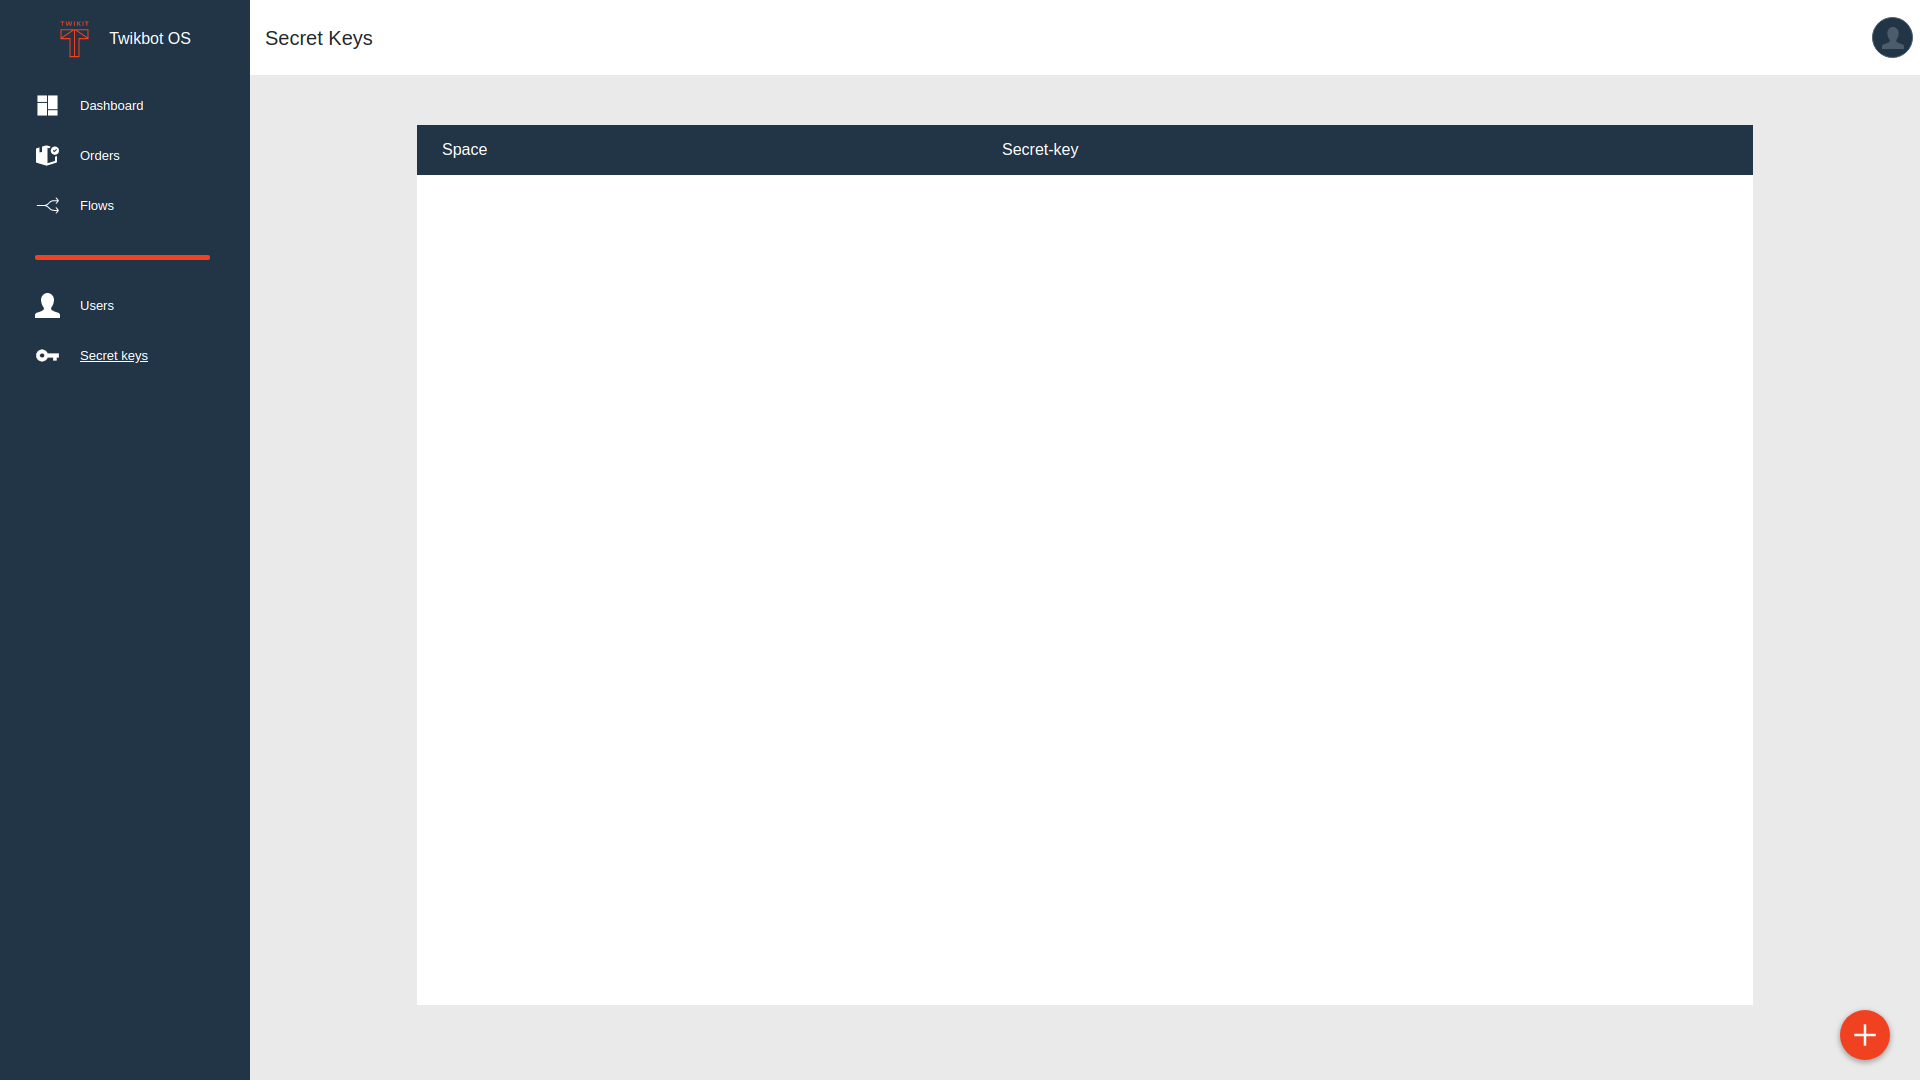
Secret keys page (admin only)
The Secret keys page allows you to see and add new secret keys for a private customer space. The keys need to be integrated into your web app to use the order service API.
A secret key is a private API key can be used by a web application to access the order service API.
Never share secret keys publicly. When you think a key is compromised, please get in touch so we can disable it.
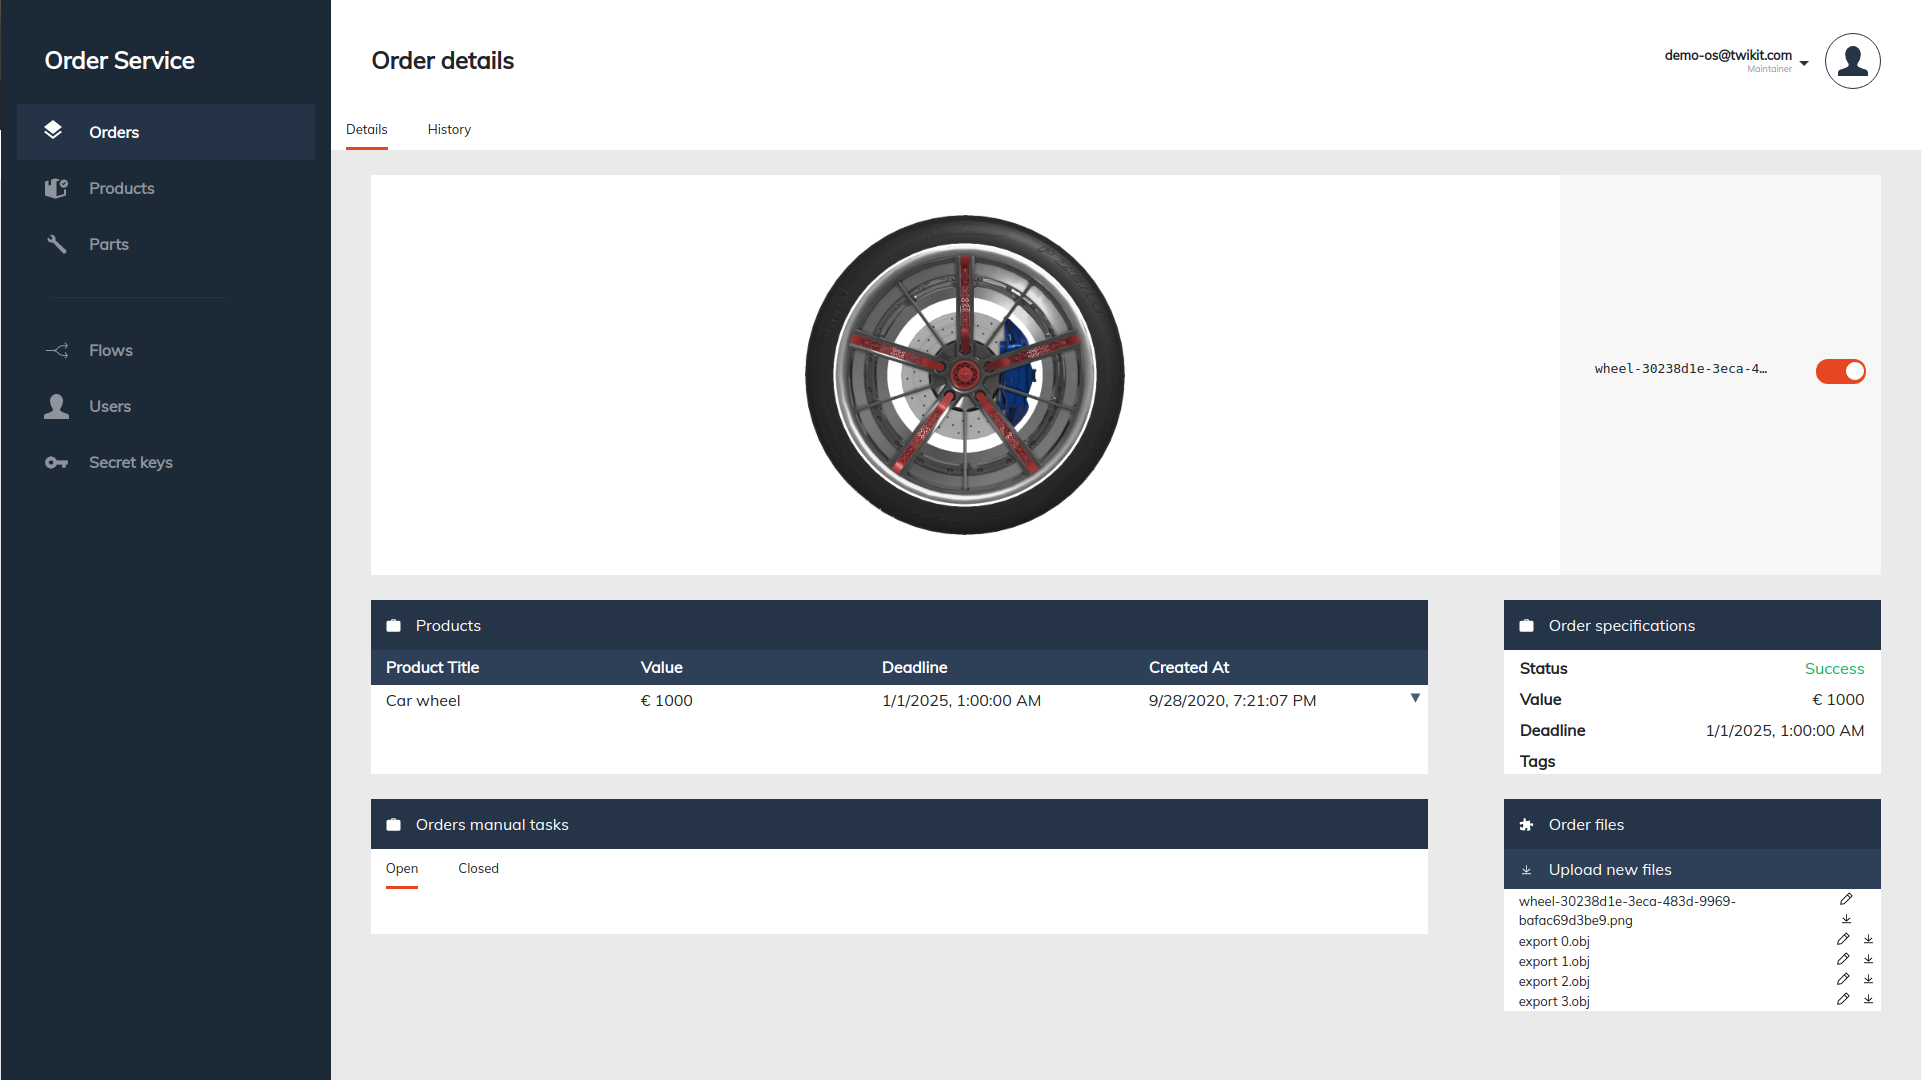
Order details page
On the order details page, you can get an overview of all detailed information about your order.
A thumbnail image that visualizes the ordered product. In the example, this is an auto-generated preview image of the product configuration for the ordered product.
A list of products. A product is a part of an order on a bill. It has its own value, deadline and creation date.
A list of manual tasks. If configured in the order flow, this card shows a list of manual actions that need to be taken to complete the order.
The order specifications card contains the overall status of the order, the value, deadline and tags from the order flow.
The order files card contains a list of downloadable order assets, such as production files and a preview image, for digital manufacturing.
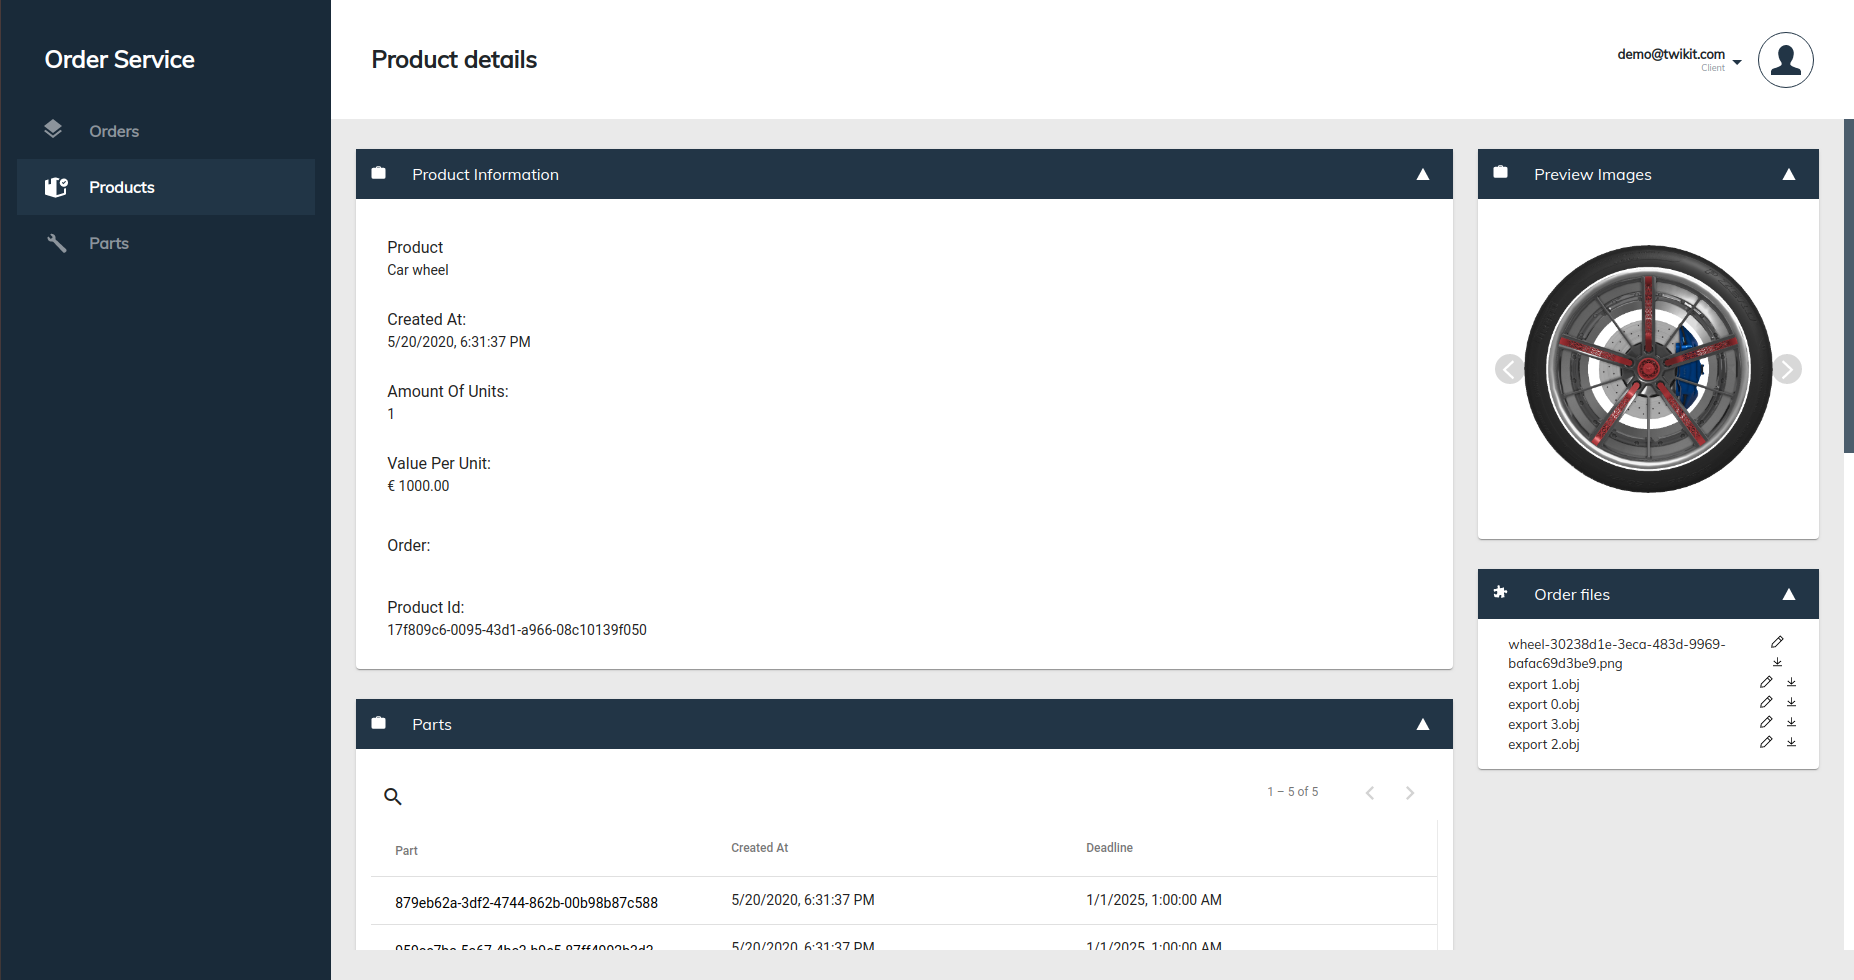
Product details page
On the product details page, the following product details are available:
General product information with the product name, creation date, number of units ordered, price per unit, order name and product ID.
A list of parts of which this product consists.
The product configuration: an overview of all parameters and their value.
A thumbnail image that visualizes the ordered product. In the example, this is an auto-generated preview image of the product configuration for the ordered product.
The order files card contains a list of downloadable product assets, such as production files and a preview image, for digital manufacturing.
Part details page
The part details page shows the following information:
General part information: the name of the product and part ID.
The order files card contains a list of downloadable part assets, such as production files and a preview image, for digital manufacturing.

Tutorials
Download order information as a CSV
For who?
Anyone who would like to get an overview of what was ordered. E.g.:
Managers who want to get order statistics in Excel.
Manufacturers who want to download assets for production.
Level
Basic
Select and download selected data as a CSV
Export selected data
Follow these steps on the Orders, Products or Parts page to export selected data:
First make sure that the visible columns in the table match the ones that you want to export.
Then, use the check boxes in front of the table to select orders for Export.
Finally, click the “Export selected” button on the top right of the page.
Export assets
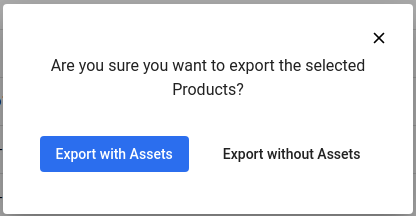
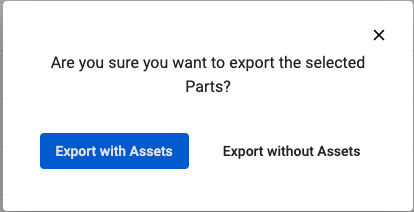
To export product assets, go to the Products page, select the relevant product(s) and click “Export selected”. A pop-up dialog with option to export with our without assets will appear. In the dialog, click “Export with Assets” to download a .zip file with asset data.
Export manufacturing info
To export manufacturing info (if available), go to the Parts page, select the relevant part(s) and click “Export selected”. A pop-up dialog with option to export with or without assets will appear. In the dialog, click “Export with Assets” or “Export without Assets”. A zip file with csv folder will contain both parts data and part-specific manufacturing data. If you clicked “Export with Assets” the zip file will contain the asset data.
Create, manage and track orders for digital manufacturing
For who?
Developers who want to integrate Twikit Order Service in their website or e-commerce website.
Level
Intermediate
Step-by-step: How to create an order
The steps below guide you through the process of creating an order for a product in a Twikit web configurator on your website or e-commerce website.
Before getting started, make sure you understand the basic concepts of Twikit Order Service by reading the getting started guide.
Generate a secret key for your private customer space in the Secret keys page on the Twikit Order Service website. (Not yet required, coming soon)
Integrate the secret key in your website. Be careful not to expose the key publicly. (Not yet required, coming soon)
On your website, gather all information to create an order:
Save your product configuration and store the configuration ID. TODO: add link to configuration service documentation.
Get the name of your order flow key on the Order flows page.
Get the name of your private customer space key.
Custom data specifically needed by your order flow such as user address info, asset URL, …
Prepare the order call by building your order data transfer object (DTO). https://orders.twikit.com/api/docs
Call the create order post rest API with your order DTO as an argument. https://orders.twikit.com/api/docs
Create your own order flows
Level
Intermediate
Step-by-step: How to create your own order flow
The steps below guide you through the process of creating an order flow that handles a product order.
Before getting started, make sure you understand the basic concepts of Twikit Order Service by reading the getting started guide.
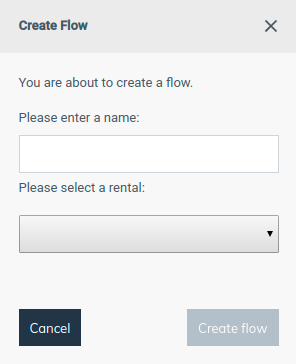
On the Twikit Order Service website, go to the order flows page and click the ‘plus’ button on the bottom right.
In the ‘Create Flow’ pop-up that appears, fill in a human readable name of at least five characters to identify your user flow. Then select a rental, which is the product space where your product is located. Finalize the flow creation by clicking the ‘Create flow’ button.
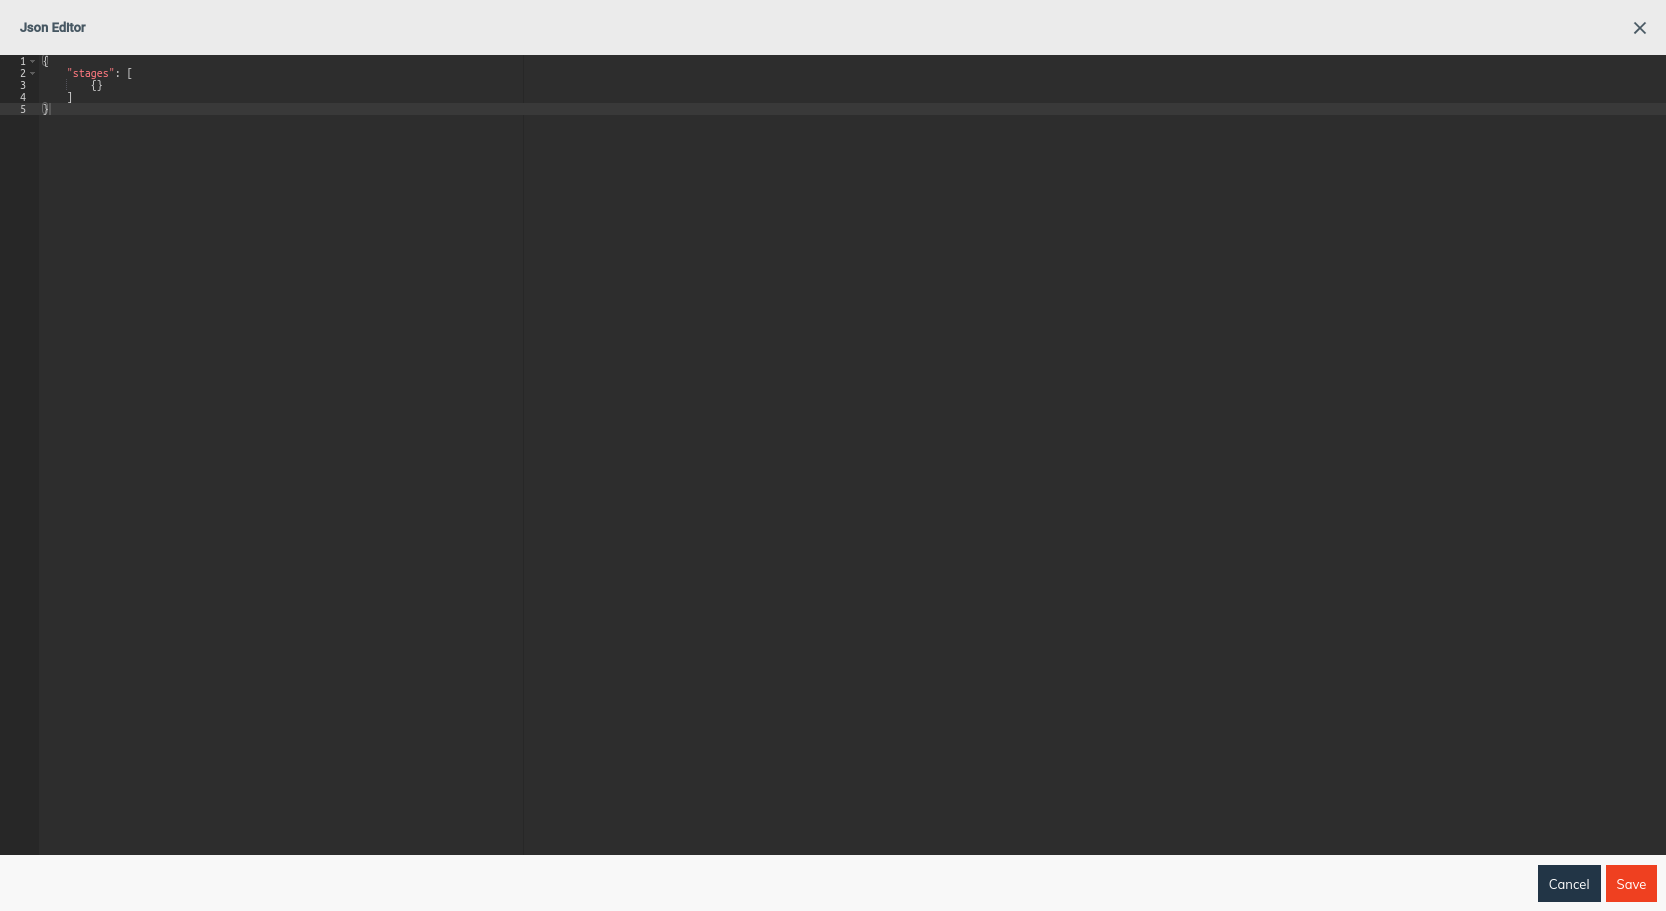
Upon successful creation of the flow, a JSON editor appears as in the picture below where you can define the required sequence of stages to fulfill your order flow. The required JSON schema to use is documented here: https://orders.twikit.com/api/docs/#/components/schemas/IFlowStage.
Example task definitions
In the sections below, you can find some example task definitions to use in your order flow stages. The task definitions describe how to use the built-in functionality for sending e-mails, getting a manual confirmation and triggering a Twikbot export.
Example 1: Send an e-mail
The task definition below sends an e-mail to a list of recipients. Notice the following items in the JSON definition below:
The handler key is set to “send-email”.
In the task definition payload, a list of recipients can be specified, as well as an e-mail subject and body with variable inputs.
The timeout duration is set to 1000 ms.
No next task definition is defined.
{
	"key": "task-key-1",
	"handlerKey": "send-email",
	"payload": {
		"recipient": [
			"test-order@twikit.com"
		],
		"subject": "My test e-mail subject",
		"body": "This is an e-mail to notify you someone ordered a product from your website.\
		         <br><br>Order url: {orderUrl} \
		         <br><br>Customer info: \
		                 <br>Name: {customerInfo.name}\
		                 <br>Email: {customerInfo.email}\
                         <br>Phone: {customerInfo.phone}\
                         <br>Message: {customerInfo.message}"
    },
	"timeoutDuration": 1000,
	"next": []
}Example 2: Send an e-mail with assets
The task definition below sends an e-mail with assets to a list of recipients. Notice the following items in the JSON definition below:
The handler key is set to “asset-email”.
The task definition payload contains the following items:,
filter: this filters asset names.
recipients: a list of recipients that will receive the e-mail once the task definition is triggered. A variable e-mail called ‘customerEmail’ can be used here.
subject: e-mail subject
body: e-mail body with variable inputs
needConfirmation: if set to true, a confirmation link will be added to the e-mail. If the link is clicked, the task definition is finished.
The timeout duration is set to 1000 ms.
The “next” field states that if this task definition finished successfully, then task definition with key “task-key-3” will be executed.
{
	"key": "task-key-2",
	"handlerKey": "asset-email",
	"payload": {
		"filter": "^\\s*(.*\\.[zZ][iI][pP])\\s*$",
		"recipients": [
			"{customerEmail}",
			test@twikit.com
		],
		"subject": "My test e-mail subject",
		"body": "Dear customer,\
		         <br><br>Please find an overview of your assets below:
		         <br><br>{assetOverview}\
                 <br><br>Best regards,
                 <br>The TWIKIT team.",
		"needConfirmation": false
    },
    "timeoutDuration": 1000,
	"next": [{
		"taskDefinitionKey": "task-key-3",
		"trigger": "success"
	}]
}Example 3: Export product with Twikbot
The task definition below calls a rest API uri that triggers an export with Twikbot.
A Twikbot export is a sequence of actions algorithms that runs on the Twikit server to calculate production files for digital manufacturing.
A typical scenario is a website with a 3D web configurator where a product is visualized in 3D in the browser in low resolution. This low resolution product is used by the end-customer for real-time visualization and setting product parameters. Upon ordering, the high-resolution models of the same product are used to, in combination with the user parameter settings, generate high quality manufacturing files. This way of working is one of the main USP’s of using Twikit. It guarantees a snappy user experience and saves an enormous amount of server costs.
Notice the following items in the JSON definition below:
The handler key is set to “consume-rest-api”.
The task definition payload contains the following items:,
uri: URI of the Twikbot export connector. It is the same for every product export.
sendsFeedback: If set to true, feedback will be sent to the
updateUrlas specified in the create order request.
The timeout duration is set to 1000 ms.
The “next” field states that if this task definition finished successfully, then task definition with key “task-key-3” will be executed.
{
	"key": "task-key-3",
	"handlerKey": "consume-rest-api",
	"payload": {
		"uri": "https://tbos-adapter.twikit.com/tbos/tb/export",
		"sendsFeedback": true
	},
	"timeoutDuration": 1000,
	"next": []
}Explore third party connectors
Level
Intermediate
Overview of existing integrations
Twikit provides integrations with commonly used solutions and service providers in e-commerce and digital manufacturing.
The existing integrations are: HP PrintOS site flow, 3YourMind network, Materialise, Ultimaker Cura. (Examples will be added soon)
New integrations are continuously added, keep posted or get in touch for the latest updates.
Freely integrate with your own API’s
Level
Advanced
How to create a connector to integrate with your own third party service
For more advanced use cases, the set of order flow connectors that Twikit provides could be insufficient. Therefore, Twikit Order Service provides a way to extend the capabilities and create your own connectors. Typical use cases are:
Receive updates when an order is created or on order status changes.
Download order files in a third party system and use them for manufacturing, back-up cloud storage or post-processing.
Before getting started, make sure you understand the concept of order flows by reading the getting started guide.
To create your own adapter that can be used in a Twikit order flow, set up your own REST API endpoint (POST subscription endpoint) according to the connector API format. Order service requires this endpoint to use https. (Different API security protocols are currently not yet supported.)
Once your endpoint is up and running, it can be used in an order flow consume-rest-api task as illustrated in the example below:
{
	"key": "task-execute-your-endpoint",
	"handlerKey": "consume-rest-api",
	"payload": {
		"uri": "https://<your_endpoint>",
		"sendsFeedback": true
	},
	"timeoutDuration": 1000,
	"next": []
}